The other day, a neighbor told me how they stripped all the old paint from their deck using a power washer. It sounded simple—blast away the layers and get to work on a fresh coat. But another friend chimed in with a warning: “Be careful! Too much pressure, and you’ll ruin the wood.” It got me thinking—will a power washer remove paint from wood or will it ruin my wooden deck?
Well, Yes, power washing can remove paint from wood, but it must be done carefully. Removing paint from wood is not just about brute force; it’s about understanding the material, using the right tools, and applying the correct methods.
In the sections ahead, you’ll learn how to safely power wash wood, recognize the risks, and explore alternatives for achieving a smooth, paint-free surface—ensuring your next project starts with a solid foundation.
Table of Contents
Will a power washer remove paint from wood? A detailed Explanation
Removing paint with a power washer is less about brute force and more about finding the right balance of pressure and technique. Think of it like peeling an orange—too much force, and you crush the fruit; too little, and the peel stays on. Here’s how power washing strips paint from wood without causing damage.
The Role of Pressure
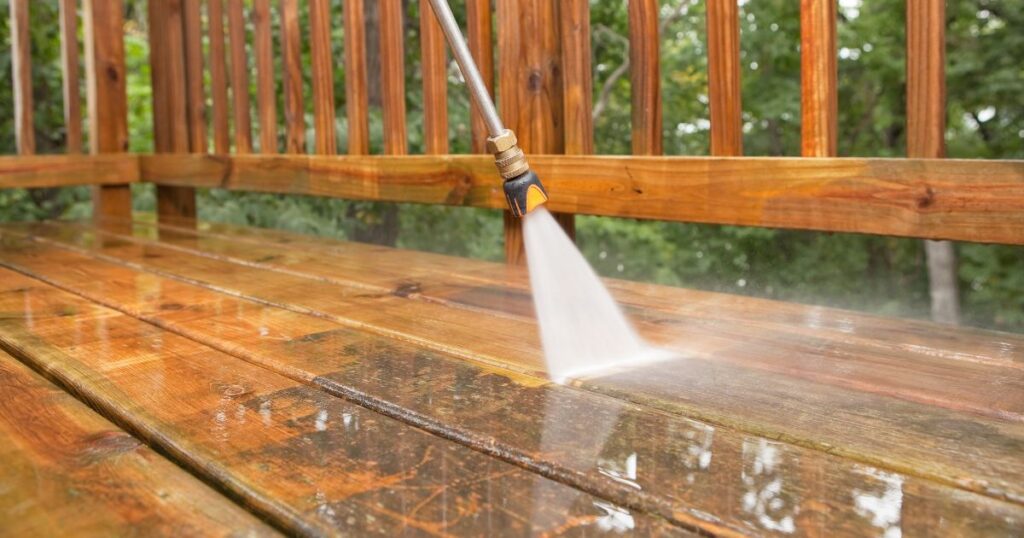
The pressure from a power washer loosens and lifts paint layers from the wood surface. Imagine water acting like tiny chisels, breaking the bond between the paint and wood. However, too much pressure can carve into the wood itself, leaving gouges or splinters. For most paint removal, a pressure setting between 2,000 and 4,000 PSI works well for hardwoods, while softer woods may require a gentler touch below 1,500 PSI.
The Right Nozzle Makes a Difference
Using the wrong nozzle is like using a hammer instead of a paintbrush—it’ll get the job done but might ruin the canvas. A 25-degree nozzle, with its fan-shaped spray, spreads the water evenly, reducing the risk of concentrated pressure that can damage the wood. Wider nozzles are ideal for sensitive areas, giving you better control.
Water Temperature: A Little Heat Helps
Warm water can make all the difference when removing stubborn paint. Heat softens old paint layers, making them easier to lift. It’s like trying to clean a greasy pan with cold water versus hot—the heat just makes things simpler.
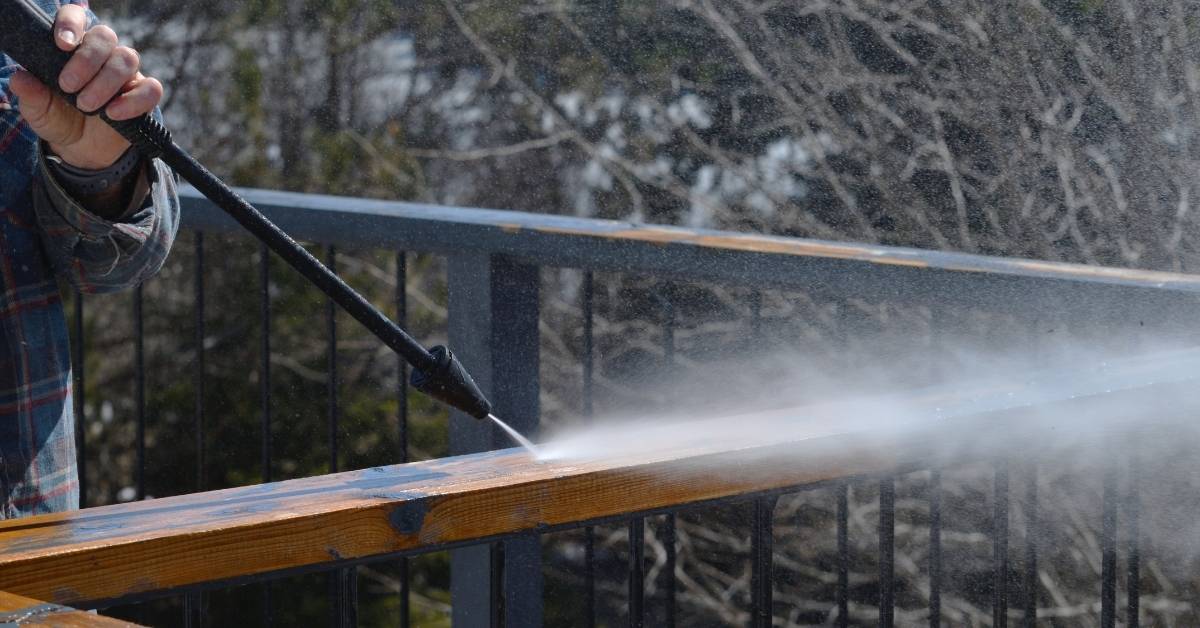
The Technique: Angle and Distance
The way you hold the washer is just as important as the tool itself. Keep the nozzle at a 45-degree angle to the surface and maintain a distance of 6–12 inches. The angle helps direct the water flow under the paint, while the distance prevents over-concentrating pressure on one spot, which could damage the wood.
Working in Sections for Consistency
Instead of tackling the entire surface in one go, divide it into sections. This approach ensures even paint removal without missing spots or causing uneven stripping. Picture mowing a lawn—you wouldn’t do it randomly, and the same principle applies here.
Adjusting for Paint Type and Wood Condition
Not all paints and woods react the same way to power washing. Older, brittle wood requires a softer approach, while harder woods like oak can handle more pressure. Similarly, oil-based paints might need a bit more persistence compared to water-based ones. Test a small area first to find the perfect balance.
Power washing is a powerful tool in your DIY arsenal, but it’s as much about finesse as it is force. With the right settings, tools, and technique, you can strip paint effectively without turning your wood into a splintered mess. Up next, let’s explore the risks you should be aware of and how to avoid them.
Risks of Using a Power Washer on Wood
Using a power washer on wood can feel like walking a tightrope—get it right, and you’re golden; get it wrong, and the results can be disastrous. While the tool is effective, it’s not without risks. Here’s what you need to watch out for to avoid turning your project into a cautionary tale.
Surface Damage: Turning Wood into Swiss Cheese
Imagine taking a chisel to your wood when you meant to use a brush—that’s what happens when too much pressure is applied. A power washer can easily gouge, splinter, or roughen the surface, especially on softer woods like cedar or pine. Even hardwoods aren’t immune if the settings are too high.
How to Avoid It:
Start with the lowest pressure setting and test a small, inconspicuous area first. Use a fan-shaped nozzle (25 degrees or wider) to distribute the pressure evenly.
Uneven Paint Removal: A Patchwork Finish
If your technique or settings are inconsistent, you’ll end up with patches of stubborn paint clinging to some spots and bare wood in others. It’s like mowing the lawn and leaving random tufts of grass behind—not exactly the smooth finish you envisioned.
How to Avoid It:
Keep the nozzle moving at a steady pace and work in overlapping sections. Maintain a consistent angle and distance from the surface to ensure even paint removal.
Water Intrusion: Inviting Trouble Below the Surface
Pointing the nozzle too closely or spraying directly into cracks can force water deep into the wood. Once inside, it’s a short trip to warping, swelling, or even rot. Think of it as inviting trouble to stay the night—it won’t end well.
How to Avoid It:
Always spray at a 45-degree angle to the surface and direct the water flow along the grain. Never aim straight into joints, cracks, or edges.
Impact on Wood’s Natural Beauty
Overwashing can strip the wood of its natural oils and fibers, leaving it looking dry, washed out, and rough to the touch. What started as an attempt to clean can end up making the wood look worse than before.
How to Avoid It:
Limit your washing time and pressure, especially on decorative or delicate wood surfaces. If the wood appears dry or damaged, consider reconditioning it with a wood restorer or oil after cleaning.
Damage to Nearby Areas
Sometimes the power washer overshoots, hitting parts of your property you didn’t mean to clean—like glass windows, nearby plants, or even yourself. High-pressure water can shatter glass, strip paint from unintended surfaces, or ruin landscaping.
How to Avoid It:
Cover nearby areas with tarps or plastic sheeting. Stay focused on the task and away from fragile or sensitive objects.
Using a power washer on wood can be effective, but it’s a tool that demands respect. With the right approach, you can sidestep these risks and achieve a clean, smooth surface ready for refinishing. So read on—we’ll explore safer alternatives and additional tips to get the best results without compromising your wood.
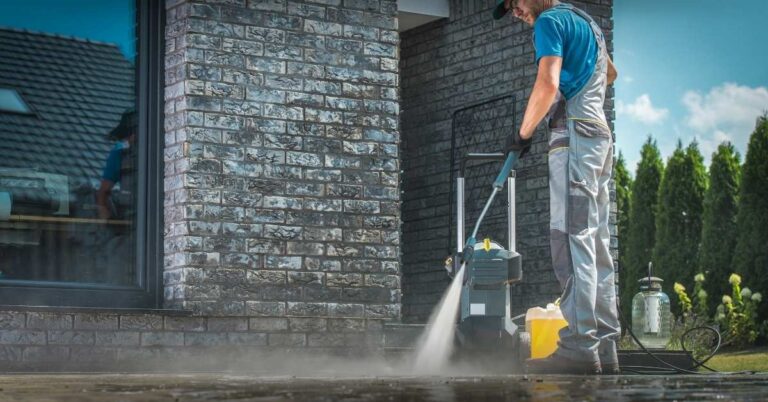
How to Safely Use a Power Washer for Paint Removal
Using a power washer to remove paint from wood can feel like driving a powerful car—you need to know how to handle it, or things can go sideways quickly. But don’t worry. With the right tools, technique, and a bit of patience, you can strip paint without damaging the wood. Let’s break it down into simple steps.
Get the Right Tools for the Job
Think of your power washer as your weapon of choice—it needs to be suited to the task. Use a pressure washer with adjustable settings, ideally in the 2,000–4,000 PSI range for hardwoods and under 1,500 PSI for softer woods. Equip it with a fan-shaped nozzle (25 degrees or wider) to spread the pressure evenly.
- Pro Tip: Add a biodegradable cleaning solution to your setup. This helps loosen stubborn paint and reduces the need for excessive pressure.
Prep Like a Pro
Before you even turn on the washer, take a moment to set the stage. Clear away loose debris, tape off areas you don’t want to hit (like windows or plants), and ensure the wood surface is dry.
- Test First: Always test a small, hidden area to make sure your settings and technique won’t damage the wood. It’s like tasting a sauce before serving the whole pot.
Set the Pressure and Get Your Angle Right
This is where the magic happens—or doesn’t. Start with the lowest pressure setting and gradually increase it if the paint doesn’t budge. Keep the nozzle at a 45-degree angle to help the water flow under the paint without gouging the surface.
- Distance Matters: Hold the nozzle 6–12 inches from the wood. Too close, and you risk splintering; too far, and the paint stays put.
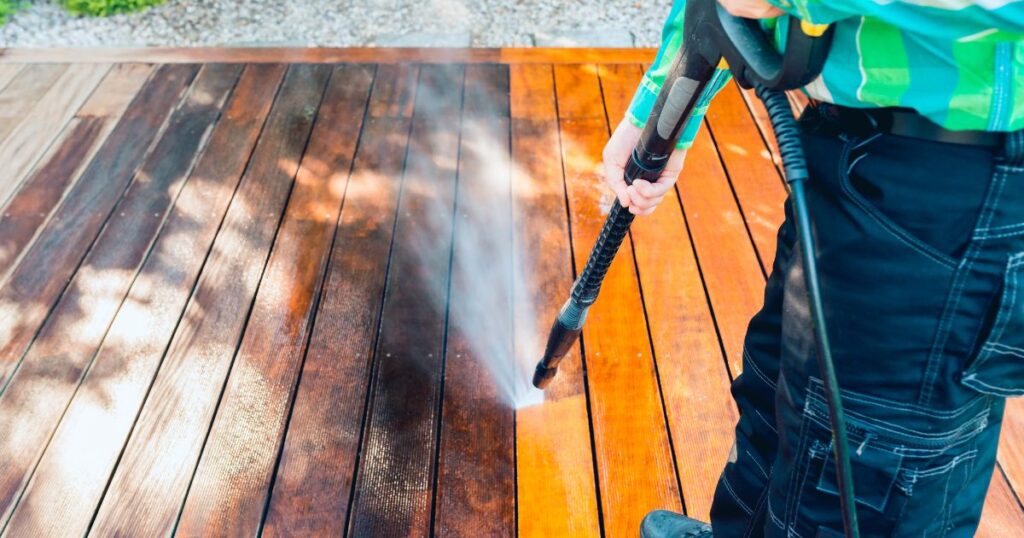
Work in Sections
Don’t rush it. Divide the surface into manageable sections and tackle them one at a time. Think of it like mowing your lawn—steady, overlapping passes ensure no spot is missed, and you won’t accidentally concentrate pressure on one area.
- Smooth Moves: Keep the nozzle moving in a sweeping motion. Lingering in one place can lead to uneven paint removal or damage.
Clean Up and Let It Dry
Once the paint is removed, rinse the surface with clean water to wash away any leftover debris or cleaning solution. Then, let the wood dry completely before moving on to sanding, staining, or painting.
- Watch for Wet Spots: Water trapped in cracks or joints can cause swelling or warping. Use a soft cloth to blot away excess moisture in those areas.
Quick Safety Tips
- Gear Up: Wear goggles, gloves, and sturdy shoes. High-pressure water can be more dangerous than it looks.
- Mind the Weather: Avoid power washing in windy or freezing conditions. Wind can blow the spray off course, and freezing water can damage the wood.
- Be Alert: Always know where the nozzle is pointing. A moment of inattention can lead to accidental damage—or worse.
Alternatives to Power Washing
Power washing isn’t always the right tool for the job. Sometimes, the wood is too delicate, the paint too stubborn, or the risks too high. Fortunately, there are alternative methods that can get the job done effectively without the potential downsides of high-pressure water. Let’s explore these options and when they make the most sense.
Soft Washing: A Gentler Touch
Soft washing is the kinder, gentler cousin of power washing. Instead of relying on pressure, this method uses low-pressure water combined with a cleaning solution to break down dirt, grime, and paint layers.
- When to Use It: Perfect for wood surfaces that might splinter or warp under high pressure, like cedar siding or weathered decks.
- How It Works: Apply a biodegradable cleaning agent, let it soak for a few minutes, and rinse it off with a low-pressure spray. Think of it as giving your wood a spa treatment instead of a power workout.
- The Bonus: Soft washing protects the wood while still lifting stubborn paint, making it ideal for delicate surfaces.
Chemical Paint Strippers: Precision in a Bottle
When you need to target paint removal without affecting the surrounding surface, chemical strippers are your go-to. These solutions soften paint, making it easy to scrape away without the risk of water damage.
- When to Use It: Ideal for intricate woodwork, furniture, or small, detailed areas where a broad spray might cause problems.
- How It Works: Brush or spray the stripper onto the paint, let it sit according to the instructions, and then scrape the softened paint away with a putty knife or scraper.
- Pro Tip: Choose eco-friendly strippers to minimize harsh fumes and environmental impact.
Manual Scraping and Sanding: Old-School but Reliable
There’s something satisfying about rolling up your sleeves and tackling a project with nothing but elbow grease. Scraping and sanding are hands-on methods that let you stay in complete control.
- When to Use It: Best for small areas or surfaces with multiple layers of paint that need careful removal.
- How It Works: Use a paint scraper for the bulk of the work, followed by fine-grit sandpaper to smooth the surface and remove any stubborn spots.
- Why It Works: This method gives you precision and avoids the risk of gouging or water saturation. Plus, it’s quiet—no roaring power washer here.
Heat Guns: Turning Up the Heat
Heat guns work by softening paint so it can be easily scraped away. It’s like using a hairdryer but on steroids—except this one is designed for serious work.
- When to Use It: Effective for small, stubborn patches of paint or curved surfaces like bannisters and furniture.
- How It Works: Aim the heat gun at the painted surface, moving it steadily to avoid burning the wood. Once the paint softens, scrape it off while it’s still warm.
- Safety Note: Always wear gloves and goggles—heat guns are no joke when it comes to safety.
Professional Services: Leave It to the Experts
Sometimes, the smartest choice is to call in the pros. Professional paint removal services bring the expertise, tools, and efficiency needed for larger or more challenging jobs.
- When to Use It: For extensive projects, delicate antique wood, or when you simply don’t have the time or energy to DIY.
- Why It’s Worth It: Professionals can use specialized techniques to ensure thorough paint removal without risking damage. Depending on the project size, the cost might range from $300 to $600, but it saves you headaches—and potentially costly mistakes.
Which Alternative Should You Choose?
If your wood is fragile, go with soft washing or chemical strippers. For small, detailed areas, stick to manual scraping or heat guns. And if the job feels overwhelming, professional help is always an option.
Common Scenarios for Paint Removal
Removing paint from wood is often the first step in breathing new life into a surface. Whether you’re restoring a deck or refinishing furniture, the approach you take depends on the scenario. Let’s dive into the most common situations where paint removal is essential and explore the best methods for each.
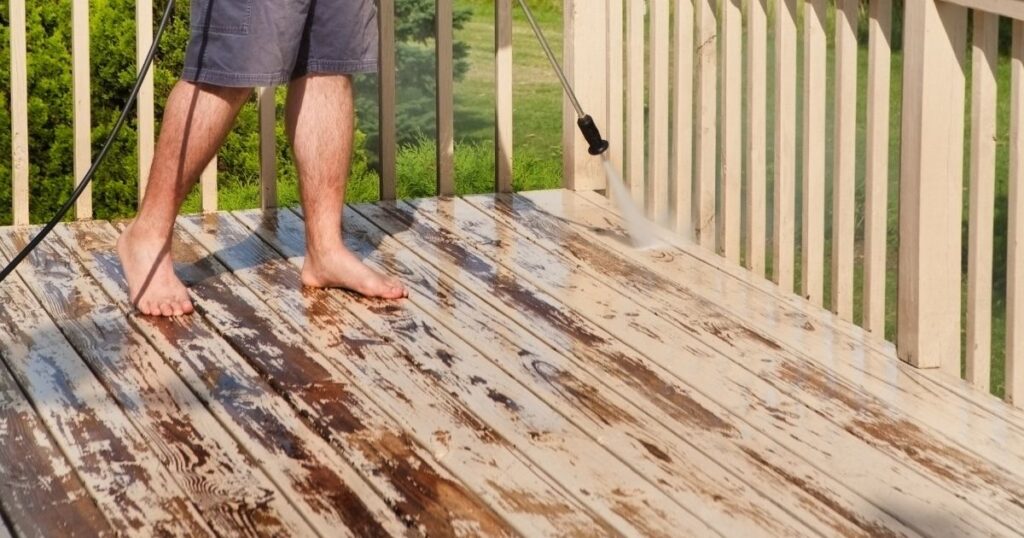
Restoring a Weathered Deck
After years of exposure to the elements, decks can become faded, chipped, and layered with peeling paint. To prepare for staining or repainting, stripping the old paint is a must.
Best Approach:
A power washer with a fan-shaped nozzle works well for large, flat surfaces, but only if the wood can handle the pressure. Softer woods may require a combination of soft washing and sanding.
Why It Matters:
A clean slate ensures your new stain or paint adheres properly and lasts longer.
Prepping Wooden Siding
Painted wooden siding often deals with peeling paint, mildew, and dirt. Proper preparation is key to protecting your home from water damage and giving it a refreshed look.
Best Approach:
Use a power washer on hardwood siding, but keep the pressure low to avoid driving water under the boards. Follow up with sanding to smooth out rough spots.
Watch Out For:
Avoid aiming directly at seams or cracks to prevent water from seeping into your home.
Refinishing Furniture
Furniture often features intricate designs and curved edges, making paint removal tricky. Whether it’s a vintage chair or an old dresser, careful handling is crucial to maintain its charm.
Best Approach:
Chemical paint strippers are ideal for detailed work, followed by sanding for a smooth finish. For smaller, stubborn spots, a heat gun can help loosen the paint.
Pro Tip:
Test a small, inconspicuous area first to see how the wood reacts.
Reviving Wooden Fences
Fences take a beating from weather and wear, often leading to peeling or discolored paint. Removing old paint not only improves their appearance but also extends their lifespan.
Best Approach:
Use a power washer on sturdy woods like cedar, but stick to low-pressure settings. For delicate sections, consider soft washing or manual scraping.
Why It’s Worth It:
A well-maintained fence boosts curb appeal and protects your property boundaries.
Preparing for Home Renovations
Sometimes, paint removal is part of a larger renovation project—like replacing trims or updating woodwork. Stripping old paint can reveal the natural beauty of the wood or prepare it for a modern finish.
Best Approach:
Combine methods like chemical strippers for detailed areas and sanding for a smooth finish. For larger surfaces, soft washing or professional services can save time.
Keep In Mind:
Removing paint before renovation ensures a cleaner, more polished outcome.
Each scenario requires a slightly different approach, but the goal is the same: to remove old paint safely and effectively without damaging the wood. Now here comes the good part—pairing the right method with your project guarantees better results and a smoother finish. Ready to take the next step? Let’s wrap up with expert tips and FAQs to ensure success!
Conclusion
A power washer can be a powerful ally in removing paint from wood, but it must be used with care. By selecting the right settings, following safe techniques, and considering the wood type, you can achieve professional results without damaging the surface. For best outcomes, especially on delicate or large-scale projects, consult an expert or combine power washing with other methods to preserve your wood’s integrity.
Ready to refresh your wood surfaces?
Whether you’re tackling a deck, siding, or furniture, reach out to our professional team for expert advice and services. We’ll help you remove paint efficiently and safely, ensuring a smooth finish for your next project. Contact us today to get started!
FAQs
What type of wood is safe for power washing?
Hardwoods like oak or teak can withstand higher pressure due to their durability, making them suitable for power washing. Softwoods, such as pine or cedar, require lower pressure settings to prevent damage.
Can power washing remove multiple layers of paint?
Yes, power washing can remove multiple paint layers, but for thicker or more stubborn coatings, combining it with chemical stripping is often more effective.
Is sanding necessary after power washing?
In many cases, yes. Power washing can leave the wood surface uneven or rough, so sanding is recommended to smooth it out and prepare it for repainting.
Can I use a power washer to remove paint from furniture?
While power washing can work on furniture, small or detailed pieces are better cleaned with manual or chemical methods to avoid damage and ensure precision.