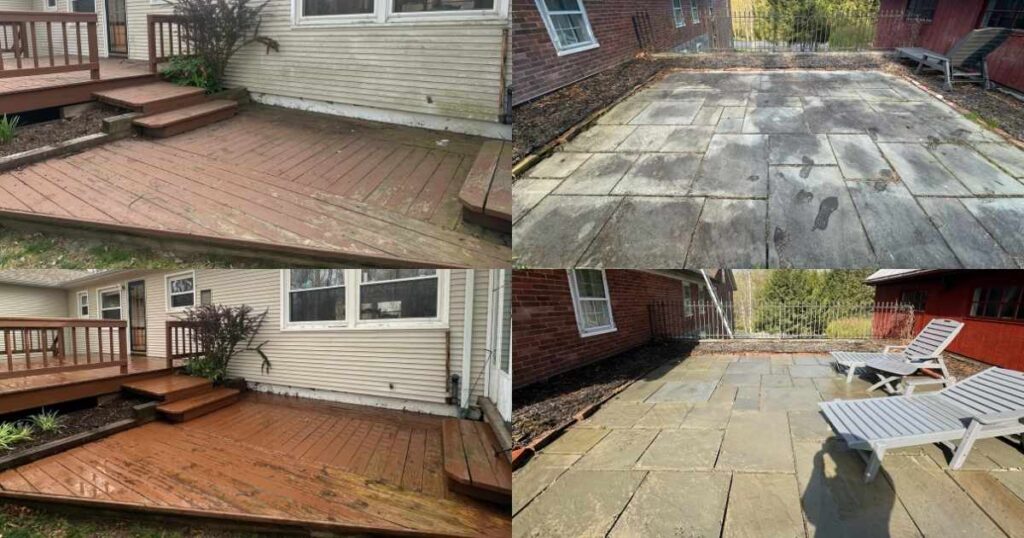
Summer’s here, and your backyard is calling. Friends, grilled food, music—it all happens out on the patio or deck. But before you send out invites, take a close look at the surface under your feet. Is it looking weathered, slippery, or stained? You’re not alone. After months of rain, pollen, and sun, most decks and patios are overdue for a good clean.
Pressure washing is like hitting the reset button. It blasts away dirt, algae, mildew, and grime that quietly build up and ruin your outdoor vibe. It’s also not just about looks—it helps prevent slippery spots, wood rot, and costly repairs down the road. Think of it as giving your deck a fresh haircut before the party.
This guide breaks down exactly how to pressure wash your patio or deck, outlines the necessary tools, helps you avoid common mistakes, and provides tips on maintaining cleanliness long after summer fades. So read on—your outdoor space is about to shine.
Table of Contents
What Makes Summer the Best Time for Pressure Washing?
Summer doesn’t just bring sunshine, it brings the perfect setup for cleaning things right the first time. The warm weather speeds up the drying process, which means a lower risk of water damage and better results if you plan to seal or stain afterward. You won’t need to worry about moisture lingering in the wood or cracks.
And let’s be honest, longer days mean more time to get stuff done. Whether you’re doing it yourself or hiring help, having a full afternoon of daylight makes pressure washing feel less rushed.
Summer also happens when your patio or deck gets the most attention. Backyard parties, BBQs, and birthday dinners need a clean, safe surface. Pressure washing before guests show up isn’t just about making things look nice—it’s about ensuring no one slips or gets a splinter.
People often forget that pollen, mold, and sun exposure can leave behind stains that get tougher to remove the longer they sit. Taking care of it now prevents those stains from baking in.
Why Your Patio and Deck Need Regular Pressure Washing
Skipping regular pressure washing might not seem like a big deal—until someone slips, or your deck starts falling apart faster than it should. Dirt and moisture don’t just sit there quietly. They eat away at surfaces and invite bigger problems.

Common Problems If You Skip It
- Slippery surfaces from mildew and algae
When your deck starts to feel like an ice rink in flip-flops, it’s often because of hidden algae or mildew. These grow fast in shaded or damp spots, turning your summer hangout into a safety hazard. - Wood rot and premature aging
If grime and moisture settle into the wood, it doesn’t just look bad—it weakens the structure over time. Boards soften, crack, and eventually need replacing. Cleaning helps stop rot before it starts. - Insect infestations and nesting areas
Unwashed patios and decks can attract bugs looking for dark, damp hiding spots. Spiders, ants, and even termites find shelter in neglected corners. - Unsightly stains and discoloration
Think spilled drinks, food grease, pollen, and pet messes. Left alone, these don’t just stain—they seep in and settle, making your deck look years older.
So, pressure washing does a lot more than make things look pretty.
Benefits of Seasonal Cleaning
- Improved appearance and guest appeal
First impressions count. Whether it’s a cookout or just you and your morning coffee, a clean space feels better and looks sharper. - Enhanced longevity of wood/composite materials
Cleaning helps your surface last longer by protecting it from decay and weather damage. That means fewer repairs—and more years between replacements. - Health and safety improvements for your family
No one wants to worry about slipping, mold exposure, or bug bites. Pressure washing keeps your space cleaner, safer, and more comfortable. - Better surface prep for staining or sealing
Planning to stain or seal this year? Pressure washing gives you a fresh, dirt-free base. That helps the product stick better and last longer.
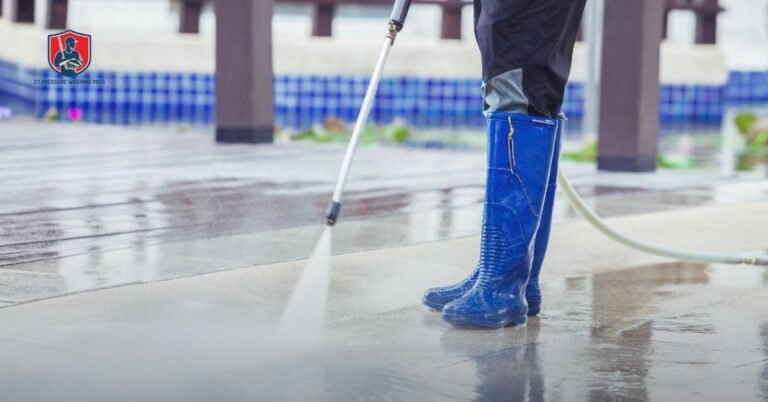
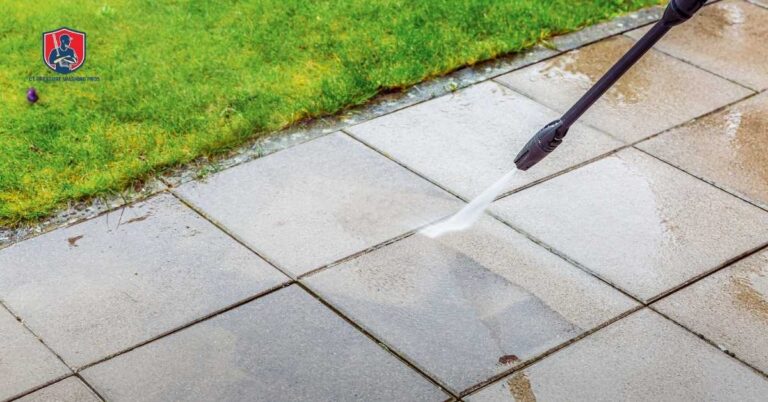
Step-by-Step: How to Pressure Wash Your Patio the Right Way
Pressure washing your patio isn’t just about spraying water—doing it right protects your surface, produces better results, and prevents expensive mistakes. So read on—here’s exactly how to do it, step by step.
Step 1: Gather the Right Tools and Safety Gear
- Choose a Pressure Washer
For patios, both gas and electric models can work.- Gas washers are stronger and clean faster—good for larger areas.
- Electric ones are quieter, lighter, and ideal for smaller patios.
- Recommended PSI Settings
- Concrete or stone patios: 2,500–3,000 PSI
- Brick or pavers: 1,500–2,000 PSI
Use a wide-angle nozzle (25° or 40°) to prevent damage.
- Nozzle Attachments
Use a spray tip that balances pressure and coverage. Avoid turbo nozzles on delicate surfaces—they can dig in and crack softer materials. - Don’t Skip the Safety Gear
- Closed-toe shoes
- Eye protection
- Gloves
- Hearing protection (if using a gas washer)
Step 2: Pre-Clean Your Patio
- Clear the Area
Move out all furniture, rugs, pots, and anything that’s not bolted down. - Protect Plants and Surfaces
Cover nearby landscaping with plastic sheeting or old towels. If there’s siding or wood trim nearby, shield it too. - Do a Quick Inspection
Check for cracks, loose bricks, or damaged mortar—mark areas to avoid with the washer. - Sweep Off Debris
Leaves, dirt, and sand can interfere with cleaning. Sweep first for a smoother wash. - Pre-Soak If Needed
Lightly wet the surface with water to help loosen dirt before you apply detergent.
Step 3: Apply Cleaner or Degreaser (If Needed)
Use an eco-safe cleaner made for patios, especially if you’re tackling grease or mold. Apply with a spray nozzle or foam cannon. Let it sit for 5–10 minutes, but don’t let it dry before rinsing.
Step 4: Start Pressure Washing
- Hold the Wand at a 45° Angle
Start at one corner and move in overlapping strokes. Don’t blast head-on—it can etch or damage brick and concrete. - Keep a Steady Distance
Stay about 12–18 inches from the surface. Get closer for stubborn spots—but test first. - Watch for Surface Damage
If you see chipping or rough patches, back off. Some surfaces can’t handle high pressure.
Step 5: Handle Common Patio Stains
Mold and Algae
Spray affected areas with a mold remover or a 1:3 mix of bleach and water. Let it sit, then rinse thoroughly. For regular use, stick with plant-safe products.
Rust or BBQ Grease
Use a rust remover or degreaser labeled safe for patios. Scrub gently with a brush, rinse, and repeat if needed.
Hard Water or Mineral Deposits
White or cloudy patches? Try vinegar and water (1:1). Let it soak, scrub lightly, and rinse off. Avoid acidic cleaners that can stain some pavers.
Step 6: Rinse and Let It Dry
Rinse the entire patio from one end to the other. Don’t leave puddles. Let it air dry completely before putting anything back. This also gives you time to check if any areas need a second pass.
Once it’s dry, your patio will look brand new. Next, we’ll walk you through how to clean your deck the same way, without wrecking the wood.
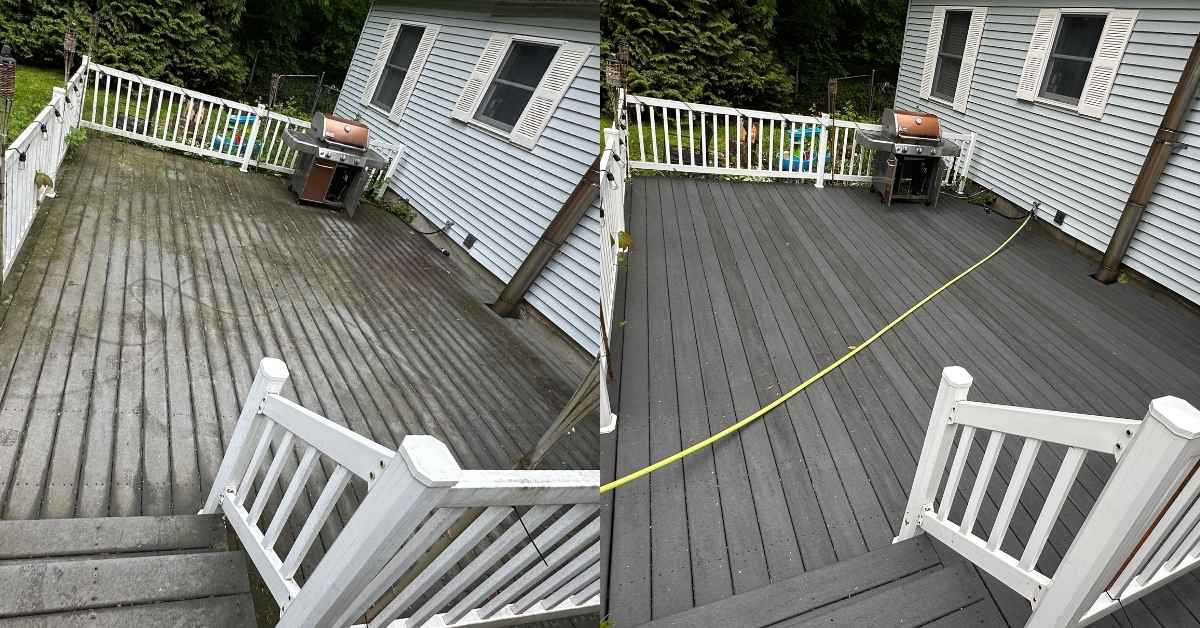
Step-by-Step: Pressure Washing Your Deck Without Causing Damage
Decks need a gentler touch than patios. Wood can splinter, composite can scar, and the wrong move can do more harm than good. But done right, pressure washing brings out the beauty of your deck and preps it for staining, sealing, or just summer fun. Let me explain how to do it the right way.
Step 1: Pick the Right Pressure Washer Settings
- Use Lower Pressure
Stick to 500–1,200 PSI for wood. Higher pressure can gouge the boards. - Choose a 25° or 40° Nozzle
These wider tips spread the pressure and protect the surface. Skip the narrow nozzles—they’re too aggressive for decking. - Keep a Consistent Distance
Stay at least 12–18 inches from the surface. If you need to go closer for a tough spot, test it first on a hidden area.
Step 2: Prep Your Deck for Washing
- Clear and Cover
Move all furniture, planters, and decor. Cover nearby plants and anything you don’t want soaked. - Inspect for Damage
Check for splintered wood, popped nails, or loose boards. Fix or mark these before starting. - Sweep Thoroughly
Get rid of leaves, dirt, and debris. Pressure washers can’t clean well if there’s a layer of junk in the way.
Step 3: Apply Cleaner (Optional, but Helpful)
- Use a deck-safe cleaner if your deck has mold, algae, or old stains.
- Apply with a sprayer or through your pressure washer’s detergent tank.
- Let it sit for 10–15 minutes—but don’t let it dry out.
- Lightly scrub with a soft deck brush if needed.
Step 4: Start Washing in Smooth, Even Passes
- Spray with the Grain
Always follow the direction of the wood boards—not across them. This avoids lifting the fibers or scarring the surface. - Work in Sections
Clean a few boards at a time in overlapping rows. This keeps the appearance even and prevents streaks. - Avoid Holding in One Spot
Keep moving the wand. Holding in one place can leave a visible mark or groove.
Step 5: Let the Deck Dry and Inspect
- Air dry completely—this may take 24–48 hours, depending on humidity and shade.
- Don’t rush to stain or seal until it’s fully dry. Moisture trapped in the wood will cause peeling or poor adhesion.
Step 6: Decide If It Needs More
Once dry, ask yourself:
- Does it look clean and even?
- Are there any soft spots or splinters?
- Is the color consistent?
If yes, you’re good. If no, spot-clean the rough patches or plan for sanding and staining.
So read on. Now that your deck’s clean and prepped, we’ll help you decide whether to DIY the finish or call in a pro. Either way, you’re halfway to a summer-ready backyard.
DIY vs Hiring a Professional: What’s Right for You?
Pressure washing sounds simple—until you damage wood, miss stains, or realize you’re soaked and tired halfway through. So, should you do it yourself or hire a pro? Let’s break it down so you can make the smart call for your home, time, and budget.
When DIY Makes Sense
- You have a small or medium patio/deck.
If your space is manageable and easy to access, renting a washer for a weekend makes sense. - You’re comfortable using tools.
If you’re handy and don’t mind reading some instructions, you’ll likely do just fine. - You’re doing basic cleaning.
For seasonal upkeep, light stains, or prep before staining, DIY is usually enough. - You want to save money.
Renting a pressure washer costs around $40–$100 per day, far less than hiring out—if you already have the time and gear.
When It’s Better to Hire a Pro
- Your deck is large, high, or multi-level.
These are time-consuming, and one mistake can cost you more than the cleaning. - The surface is delicate or damaged.
If the wood is old or the patio has cracks and loose joints, a pro knows how to clean safely. - You’re dealing with tough stains or mold.
Professionals have stronger equipment and eco-safe cleaners that work faster and better. - You plan to stain or seal after
A proper wash is step one. If you want top results and don’t want to risk doing it twice, a pro gets the surface truly ready.
Cost Comparison: DIY vs Pro
| Option | Average Cost |
| Rent + supplies | $60–$150 (1–2 days) |
| Professional wash | $250–$600+ (depending on size) |
DIY saves money if you do it right the first time. But a bad job can leave marks, strip wood, or soak your siding—and fixing that costs more than just hiring someone in the first place.
Pro Tips for Long-Term Deck and Patio Maintenance
Pressure washing gives your outdoor space a fresh start—but how you care for it afterward decides how long that clean look lasts. Here are five simple but effective ways to keep your patio and deck in great shape year-round:
1. Rinse High-Traffic Areas Regularly
You don’t need to pressure wash every month, but a quick rinse with a garden hose helps. It washes away dirt, pollen, spills, and food bits before settling and staining.
2. Sweep Weekly—Yes, Weekly
Leaves, dust, and moisture create the perfect mix for mold and mildew. A five-minute weekly sweep keeps buildup away and makes deep cleaning easier later.
3. Apply Sealant or Stain Once a Year
Apply a quality stain or sealant after a good pressure wash and a full dry. It protects against sun damage, moisture, and grime. Wood decks especially benefit from this annual step.
4. Move Furniture Around Occasionally
Keeping chairs, grills, or planters in one place can cause uneven fading and leave moisture trapped underneath. Just shifting things around occasionally helps your surface wear more evenly.
5. Spot Clean Spills Immediately
Grease from BBQs, wine, or pet messes can stain fast. Keep a mild outdoor cleaner handy and tackle stains as soon as you see them. It saves you trouble down the line.
But there’s more—if you follow these small habits, your next pressure wash will be faster, easier, and more effective.
Conclusion
Your patio or deck doesn’t need a full makeover—it just needs the right kind of care. Pressure washing is one of the simplest ways to protect your outdoor space and enjoy it at its best, whether hosting friends or just unwinding after work.
But don’t treat it like a one-time chore. Think of it as part of a bigger plan to make your home more inviting, safer, and longer-lasting without spending a fortune. Whether you’re rinsing off weekly grime, sealing your deck each year, or finally booking that pro-wash you’ve been putting off, each step pays off.
And here’s the real win: clean outdoor spaces get used more. When your deck looks good, you’re out there more often. You connect, you relax, you live. So if your outdoor area has been quietly collecting dirt and dust, now’s the time to do something about it.
Get it clean, keep it clean, and enjoy every cookout, coffee, and conversation that happens this summer.